Installing The Bonez Intake On An '86-'88
The Bonez intake from Rotary Performance provides a great (although expensive) way to get more air into the engine. Rotary Performance makes a kit for both the '86-'88 and the '89-'92 models. Installation on the later models is straightforward, but there are a few issues with the earlier models that need to be explained.
If you received your kit with instructions (I didn't get any), or have seen the pictures on the Rotary Performance site, you will see that the installation has you rotate the air flow meter (AFM) 90 degrees. This allows the supplied bracket to bolt the AFM to the factory location. The problem with this method is that the flapper door in the AFM is now facing down, which allows gravity to pull on it and effect the readings the ECU sees. This will cause the car to run rich, and may result in loss of power, stinky exhaust, and failed emissions test. The instructions below show you how to install the intake, keeping the factory orientation of the AFM.
Parts Required
- Step 1 - Remove factory airbox
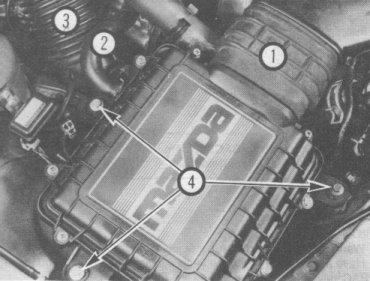
- Undo the clamp that holds the air duct to the throttle body, and disconnect the air pipe that plugs into the bottom of the air duct. Remove the three bolts that hold the airbox to the car. These bolts are located as shown in the picture below.
Wiggle the airduct off of the throttle body, then wiggle the airbox away from the factory snorkel. Also remove the small hose that connects the airbox to the air pump, and disconnect it from the pump as well. At that point, you need to remove the wiring harness from the AFM. Use a small screwdriver to remove or pry the metal locking ring, then disconnect the plug. Remove the airbox from the car.
- Step 2 - Remove AFM from airbox
- Remove the 4 bolts that connect the airbox to the AFM, then separate the AFM from the airbox. You may now set the airbox aside.
- Step 3 - Install the filter adapter
- The intake of the AFM is a square hole, whereas the filter clamps to a circular fitting. To solve this classical problem, the kit includes an adapter. It simply bolts onto the intake of the AFM using the same 4 bolt holes that the airbox used. You will need to use the liquid gasket maker to seal between the adapter and the AFM. Don't crank down on these bolts very hard, as it is easy to strip the holes in the AFM. Be very careful when applying your liquid gasket as you don't want to gum up the AFM. It's a very expensive part to break.
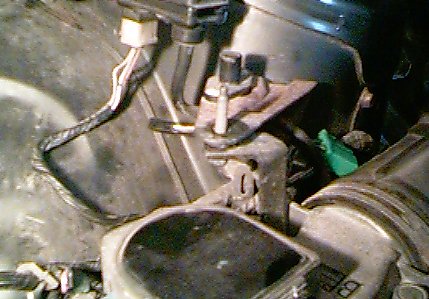
- Step 4 - Install mounting bracket
- This is where we differ from the instructions supplied with the kit. What you need to do is take one of the left over airbox mounting brackets, and attach it to the back of the AFM. First, remove the clamp holding the intake duct on, then remove the duct. Now position the bracket as shown in the picture below and bolt it down. You may then reinstall the duct.
- Step 5 - Install the filter
- It is far easier to install the filter onto the AFM while it is out of the car. They are usually pre-oiled, but if it is not it can be oiled with standard K&N chemicals. Use the large hose clamp to secure the filter to the AFM. You don't need to tighten it too much, just a little more than is require to get a good seal. At this point, also install the smaller filter onto the intake pipe on the air pump.
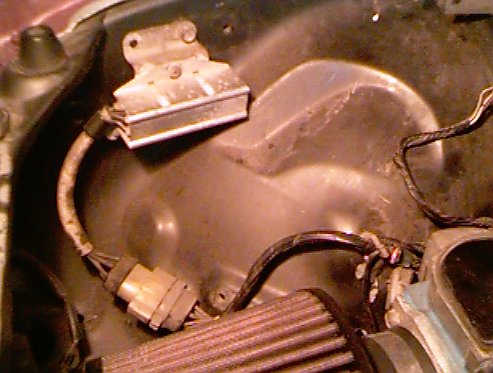
- Step 6 - Relocate injector resistors, remove extra mounting brackets
- The stock location for the injector resistor pack places then directly in the way of the new intake. Remove the resistor pack by removing the two bolts, then using one bolt, attach it to the inner passenger fender using bolt hole already there.
At this point, remove all the mounting brackets that were previously used to attach the stock airbox.
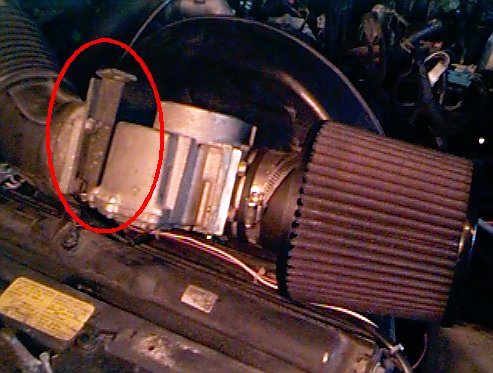
- Step 7 - Install new intake
- Position the intake in the car, and push the air duct onto the throttle body. Don't clamp it on yet. Now, using one of the long bolts that held the stock airbox on, bolt the AFM under the left over stock mounting bracket (this will be the one you didn't remove, as it also holds the boost/pressure sensor). See the picture below for reference.
Note that you want to use the bolt upside down. It is a little awkward to get it tightened, but it cannot be installed the proper way as the fitment would not be correct. Now, install the air hose on the air duct, and tighten the clamp to the throttle body. Reconnect the wiring harness to the AFM.
Notes
1. If the car does not start, check your wiring around the AFM. The plug may not be in all the way, or the contacts may need to be cleaned.
Back To Mods Page | Mail Me | Search