Cleaning The 5th and 6th Ports
All naturally aspirated second generation RX-7s have a 6 port induction system. The 5th and 6th ports stay closed until approximately 3800 RPM, at which time they open. This is similar to the VTec cam in a Honda engine. The resulting port allows the intake to form a natural supercharging effect, and changes port timing slightly. This results in more high end horsepower. Because keeping these ports open at low RPMs degrades performance, they are only open when required.
Unfortunately, these ports have a tendency to stick and freeze up if not used (and shame on you for not using them). A surprising amount of RX-7s are running around with non-working ports, which will result in a loss of about 25HP above 4000 RPM. If you have determined that your ports are not working by testing them, then they will need to be fixed. Instructions are below.
Parts Required
Instructions
- Step 1 - Locate the actuators
- Looking at the image below, you will find that they are on the passenger side of the engine right above the exhaust manifold.
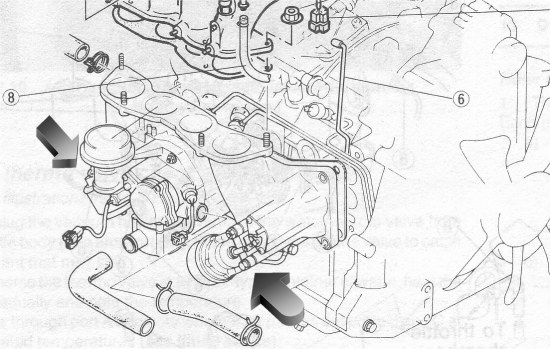
- Step 2 - Remove the actuators
- Remove both actuators. The one closest to the front of the engine can be awkward to work on because of the air pump, so you may need to remove the pump. Use needle nose pliers to remove the snap rings (if present) from the shaft of the port valves. Now, remove each actuator by taking off the two nuts and sliding it off the valve.
- Step 3 - Free the valve
- Apply penetrating lube to the port valve shaft and work the valve back and forth with your hands. If you cannot free them, the upper and lower intake will have to be removed.
- Step 4 - Free the actuator
- Clean the gasket surface of the actuator. Shoot penetrating lube into the hole and begin to work the shaft in and out. Lube the shaft and work it in and out. After all is said and done, the actuator should be easy to push down with your finger.
- Step 5 - Reinstall
- Clean the gasket surface of the engine, then reinstall the actuator with a new gasket. Be sure that the connector on the actuator slides over the shaft on the valve.
- Step 6 - Clean up
- Remove all lubricant from the shaft of the actuator. If you do not do this, they will attract dirt and stick again.
Notes
1. If the valves are stuck and cannot be freed from outside, then the intake must be removed. Have fun.
Back To Tech Page | Mail Me | Search