How To Add Cruise Control
Several models of RX-7 came with cruise control. Off hand, the GXL and Turbo II had a cruise as a standard option. However, this does not mean that you cannot have this particular feature in another model. All you need is access to a cruise equipped parts car. These can be found at wrecking yards, or online sources such as The Parts Trader. The wiring is already there, so all the hard parts are done. To install the rest of the system is a simple plug and play operation, which will definitely pay off on long drives.
Parts Required
- Cruise control computer
- Cruise servo
- Cold start assist bracket
- Cruise switch
Instructions
- Step 1 - Obtain the parts
- If you find someone parting out a car, then you can have them remove the parts for you. You could also have a wrecking yard get them out of one of their cars. Otherwise, you will have to remove the parts yourself.
Cruise computer: This is located in the drivers side left kick panel. If you remove the panel, you can see the cruise computer stuck behind a wiring harness. It can be recognized by it's plain metal casing, with the Mitsubishi logo stamped on the front. The picture below should help you locate it.
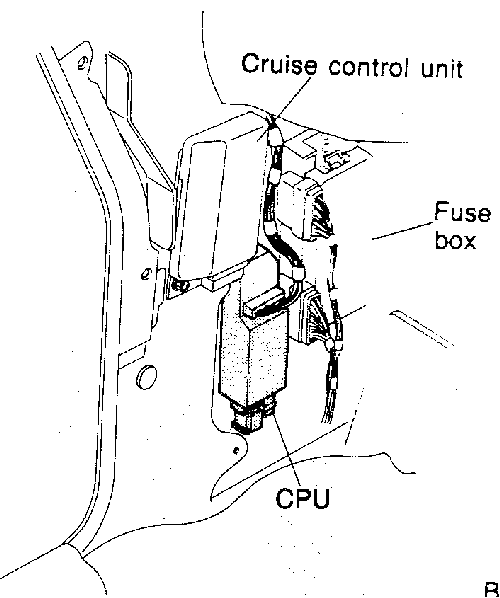
It can be removed by simply removing the two nuts (save them), disconnecting the wiring harness and pulling it out.
Cruise switch: The cruise switch is located on the right bottom side of the instrument bezel. For removal instructions, see the daytime running lights modification. The switch comes out with two small screws.
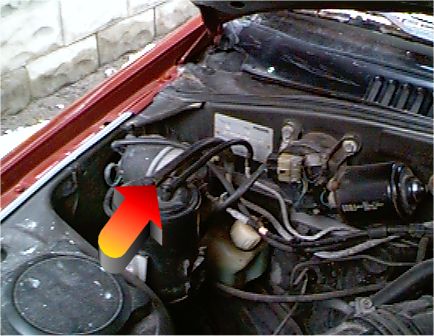
Cruise actuator/sub zero bracket: This is located in the engine bay on the passenger side by the windshield. It is held on by three bolts. Remove them and save them. Now disconnect the vacuum hose from the manifold and unclip the cable from the throttle body. After you disconnect the wiring harness, it lifts right out. At this time, also remove the mounting bracket from the sub zero starting unit. The sub zero tank just slides right off and the bracket comes off with two bolts. Save the bolts. The image below shows the location of the servo.
- Step 2 - Install computer
- Remove the panel in the drivers kick panel by first taking out the plastic fur trees and removing the first two screws in the door sill cover. With the screws out, bend the sill cover up slightly and pull out the kick panel. You should see the two studs just waiting for something to be installed. The cruise computer slips right over those studs, however it would be a good idea to locate the wiring harness first. It will be shoved somewhere out of the way and is easier to find without the computer installed. Find the harness, plug it into the computer, and install the computer onto the studs using the nuts you saved when you removed the computer. Reinstall the kick panel, fur trees, and screws for the door sill cover.
- Step 3 - Install switch
- Remove the instrument bezel following the instructions in the daytime running light modification. Remove the cruise switch block off plate from the lower right corner. Now slide the switch in, turning it slightly so the lever clears the opening. Install the two screws, making sure not to over tighten. Reinstall the bezel, remembering to reconnect all wiring, including the cruise harness.
- Step 4 - Install servo
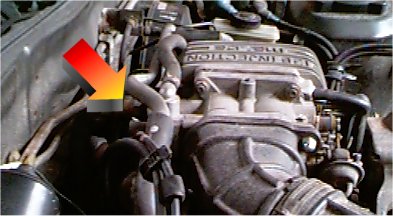
- Remove the original sub zero unit and bracket. Install the new bracket and reinstall the sub zero unit. At this point, find the cruise servo plug and pull it into the open. Mount the servo and secure it using the three bolts. There is probably a black plastic plug in the hole on the wheel well. Remove it and use a wire brush and penetrating lubricant to remove any rust. If you don't, the bolt will get stuck and break off. Now route the vacuum line to the back of the intake manifold. You should find some capped off vacuum nipples. Pick one and connect the vacuum line. Now route the throttle cable over the manifold to the throttle body. There is an existing bracket that the cable slides through, and the end clips right onto the throttle lever. You will notice that a bolt on the end of the cable provides for adjustment. The image below points to the throttle cable entering the bracket.
- Step 5 - Test and adjust
- Start the car and let it warm up for a minute. Drive it until it has reached normal operating temperature. If you now have a high idle, the cable is pulling the throttle open. With the engine running, open the hood and loosen the adjustment bolt until the idle returns to normal. You may have to repeat this. Find a good road and activate the cruise control. It should work as normal. If not, then check all connections. Also check the switch on your clutch pedal and brake pedal. If it still refuses to work, there is a problem elsewhere in the system and standard troubleshooting should be used to locate it.
Notes
1. When removing parts from a car at the wreckers, be careful and don't break anything. Others may want the part you just broke.
2. When working under the hood of a running car, be careful of belts, fans, exhaust manifolds and other dangerous parts. Also stay clear of ignition wires.
Back To Mods Page | Mail Me | Search | 