Changing The Transmission Fluid - The Easy Way
It's one of the most neglected fluids in the entire car. Hardly anyone ever changes the transmission fluid, and really, can you blame them? For all the engineering that was put into the RX-7, Mazda made a major mistake with the transmission. The fill plug is on the side of the case, tucked between the transmission itself and the body of the car. Very inconvenient to get to, and completely impossible to access with a jug of fluid or pitcher. And before you ask, no, you cannot just pour the fluid through the shifter opening. It is a completely separate assembly from the transmission.
Of course, professional mechanics use a fluid pump to quickly fill the transmission. While it is very efficient, it is also quite expensive and beyond the realm of the driveway mechanic. Not to mention that a lift is required as the pump does not fit under the car. Many people have tried some interesting solutions, from long tubes, to turkey basters, to beer funnels. Each one works to a degree, but usually more transmission fluid ends up on the driveway than in the car. This annoyance has caused me to develop the solution below. Using air pressure (from a shop compressor, or 12V compressor), it will put 2.5 quarts into the transmission in under 5 minutes, with not a drop spilled.
Parts Required
- 2.5 Quarts Transmission Fluid (I recommend Amsoil Synthetic)
- Shop Air (low pressure) or 12V Compressor
- Rubber Ball Filling Needle or Inflatables (ie. beech ball) Filler (this is best)
- 2 to 3 Feet Plastic Tubing (I normally use clear 3/8" outside diameter)
- Step 1 - Lift the car
- The easiest way I've found to lift a car for the home mechanic is to simply use jacks and jack stands. Use the jacks to lift the car and set it on jack stands. The jack stands should be positioned under heavy frame members such as engine cross members, the rear differential brace or the differential itself. Do not use regular jacks to support the car while you are under it as doing so is just an invitation to be crushed. Car ramps can also be used but can be more awkward to set up, especially if you are lacking floor jack. I personally prefer ramps because they just look more stable than stands. Either way, you want the car level and high enough so you can fit underneath.
- Step 2 - Remove the fill plugs
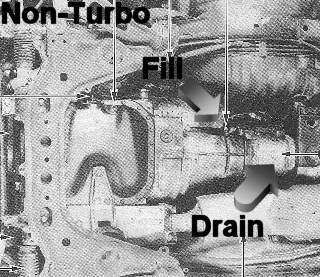
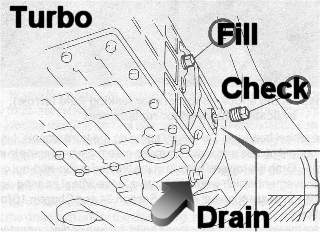
- It is very important to remove the fill plugs before you remove the drain plugs. This ensures that they are not rusted in place, and you can actually put fluid in after you take it out. I personally use a set of Vice-Grips to break them loose (often with the aid of a hammer) and then a monkey wrench to finish the job. The non-turbo transmissions have one fill plug, while the turbo models have two. This is shown below (pictures stolen shamelessly from the Haynes repair manual).
- Step 3 - Drain old fluid
- Place a catch basin under the drain plug and open it up. As I recall, the plug for non-turbo cars is 24MM, but I simply use a pair of vice grips. For turbo cars, open it the same way you would the fill plug (described above). Carefully remove the plug and allow the fluid to drain out. While the fluid is draining, clean all the metal shavings from the magnetic plug (a small amount of shavings is normal, huge mounds are excessive and indicate a problem such as worn bearings) and move onto the next step.
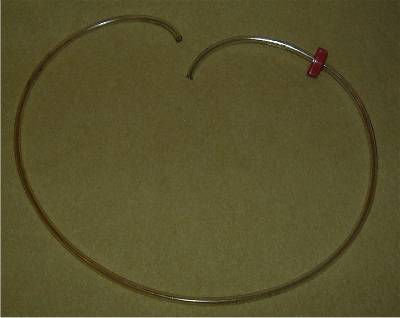
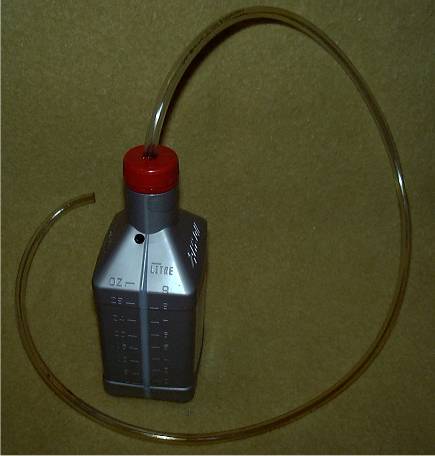
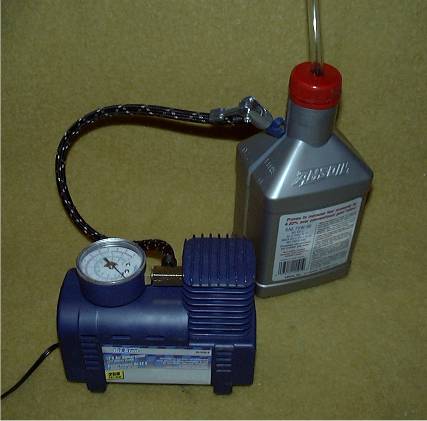
- Step 4 - Make the "pump"
- The secret of this method is that you will be making a simple air-powered pump. Simply remove the cap from your jug of fluid and drill a hole through the middle. Make the hole one size smaller than the plastic tube. Now, smear some fluid on the tube and slide it through the hole until there is enough tube to reach the bottom of the jug. You should end up with an assembly like the one shown below.
Using a drill bit just slightly larger than your ball inflation needle or inflatable toys adapter, drill a hole into the neck of your transmission fluid jug. It should be above the fluid level to avoid spillage. If possible, try not to get any plastic shavings into the fluid. The best way to do this is to press firmly with the drill to help "punch" the hole. Then simply screw the cap back onto the jug. It should look like the picture below:
- Step 5 - Reinstall drain plug
- Reinstall the drain plug in the bottom of the transmission. I prefer to wrap a few turns of Teflon tape around the threads, then tighten snugly. The tape helps seal the plug with less torque on the threads. This makes it much easier to remove next time.
- Step 6 - Fill the transmission
- This is where the magic happens. Put the open end of the plastic tube into the fill hole on the side of the transmission. You should be able to catch the end on the internals of the transmission to prevent it from falling out. Attach your ball inflator or toy inflater (again, the inflatable toy adapter is best) to your air source and turn on the air. I usually use a small 12V compressor, connected to the battery with jumper cables. Now, with the air nozzle slightly moistened with transmission fluid, push it through the hole in the jug to form a decent seal. Watch in amazement as fluid begins to flow through the plastic tube and into the transmission.
The trick here is to avoid over pressurizing the fluid jug. Personally, I try to never get it past 25 PSI. If you go too far, the jug will burst, completely covering everything around you with transmission fluid. Ask me how I know. It is helpful to use the varying pressure of your fingers to control the air leakage around the nozzle, thus controlling the pressure in the jug. It sounds a lot more complicated than it really is.
As you get near the bottom of the jug, you will probably have to turn it at an angle so the pickup tube can get a constant supply of fluid. When the jug is empty, simply refill with fluid and continue until the transmission is full.
- Step 7 - Replace the fill plug
- One the transmission is full, turn off your air source and remove your tube from the transmission. Clean off the treads of the fill plug and wrap with a few turns of Teflon tape. Install the plug in the transmission and tighten snugly with a monkey wrench.
- Step 8 - Finish up
- Wipe the transmission clean and remove all tools and equipment from underneath the car. Now, safely lower the car.
Notes
1. If you overfill the transmission, you will probably get leakage around the seals. This can actually blow out the seals at the worst, and will coat the underside of your car with transmission fluid at the least.
2. You can easily make a permanent version of this device using a glass bottle, some basic plumbing adapters (flanges and nipples) and a little copper pipe. A small 180 degree bend at the transmission end of the tube forms a hook that will keep the tube firmly in the transmission.
3. Again, I am warning you about inflating the transmission fluid jug too much. If it explodes, it will make a horrible mess and may actually be dangerous.
Back To Tech Page | Mail Me | Search | 