| Home > Circuits > Major Projects > Electromagnetic Levitator |
| Home > Circuits > Major Projects > Electromagnetic Levitator |
| Author | Views | Views Today | Rank | Comments |
| 150,169 | 15 |   |
15 |
|
This circuit creates a stunning display of the "magic" of magnetism by suspending a small metal object in mid air. Using an electromagnet, photo sensor and closed loop control, small and light metal objects can be floated just underneath the magnet, enclosed in a decorative arch. "No strings" are easily demonstrated by the ability to pick the metal object out of the air and place it back under the magnet at will. With the object floating about 1/4" under the magnet (exact distance will depend on the weight of the object), an LED and photo transistor arrangement let a feedback circuit know it's position. The circuit controls current to an electromagnet to maintain an equilibrium between the force of the magnet and gravity. Thus, the object floats. Impart a bit of a spin to the object and momentum will carry it for quite a long time as the only friction working against it is between the object and the air. |
Circuit Assembly |
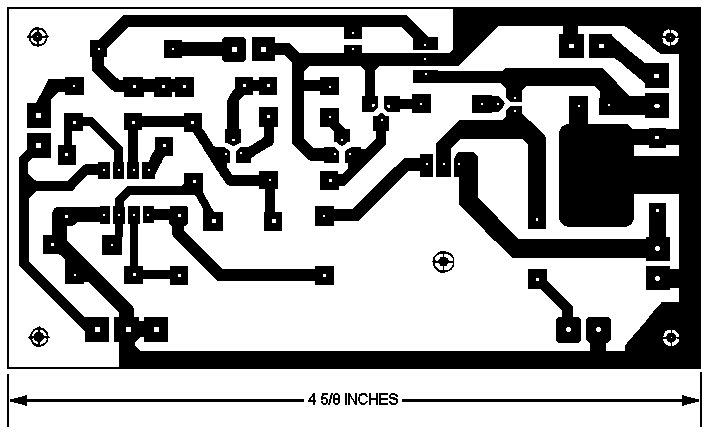
This project is built in two sections; the circuit and then the enclosure/base. Assembly of the circuit should take place on a printed circuit board to minimize the chance of oscillation and to keep the assembly need and compact. A printed circuit board pattern is provided below. Before using it as a template for your board (using either a photographic or laser process) it is important to check its dimensions when printed. Make a test print on regular paper and then measure the result, comparing it to the measurement shown on the board pattern. If they don't match, you will need to adjust your printing settings or scale the pattern in the photo editing software of your choice. While a tiny amount of variance will not make much of a difference, about 1MM is enough to make fitting ICs very difficult. Once you are satisfied your pattern is correct, etch the board using the method of your choice and then drill out component lead holes.
Assemble the parts onto the board using the parts placement diagram shown below. Make sure to check the position of all polarized parts against the schematic before they are soldered into the board. ICs, diodes, transistors, electrolytic capacitors and LEDs must be placed properly or they will not function and may be damaged.
As the board will be mounted into a case, some components are mounted off board with wire leads connecting them to the PCB. D1, D3, Q1, R9, L1 and S1 should be connected to the board via wire leads. S1, R9 and D3 should be on leads about 6" to allow mounting on the front of the case. Q1 and D1 will require longer leads (about 8-10") as they will be mounted on the bracket supporting the electromagnet. L1, the magnet, needs enough lead length to get it to the top of that bracket so use between 12" and 14" of wire.
L1 is the electromagnet coil assembly from a Potter & Brumfield KUP11D15-6VDC relay. Pull the relay casing off and then remove the coil assembly by snapping its bracket from the plastic bottom. Be careful not to damage the coil windings or the fragile leads connecting the coil to the pins. The KUP11D15 is available from many online suppliers and quite likely through your local electronics store. It was commonly used in HVAC so if you are having trouble locating it through an electronics supplier, try a heating and cooling supplier. The relay is in a socket type case with a clear plastic cover. Substitutions are also available from several manufacturers and most relays having similar physical dimensions will also work as long as the coil voltage is the same. If you can't find the P&B relay or you wish to experiment you can of course wind your own coil. Use very thin magnet wire (34 or 35 gauge) and wind about 100 feet onto a 1/4" bolt which has been cut to a lenth of 1.5". By chucking the bolt into an electric drill you can make winding easy but be very careful to control the wire speed as it will turn into a razor blade if moving quickly.
The circuit runs on 12V supplied from a 12VDC 500MA "wall wart" power adapter. This keeps the size of the base small and desk-friendly.
Schematic |

Printed Circuit Board Layout |
Printed Circuit Board Parts Placement |

Parts |
|
Enclosure and Base Aessembly |
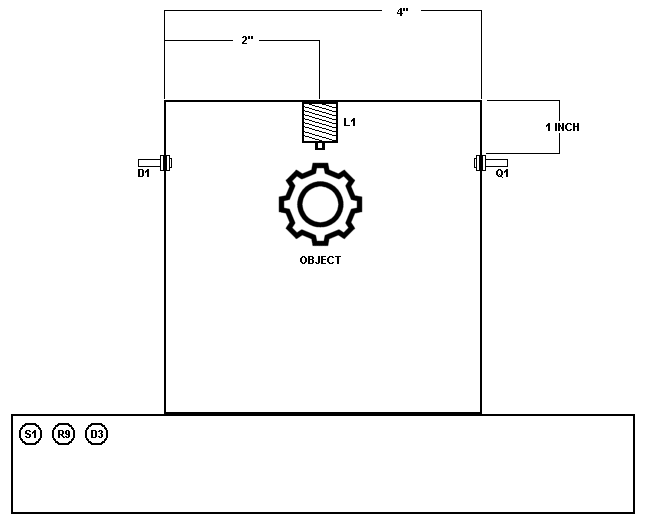
With the circuit complete, the next task is to assemble the physical structure. It is divided into two parts; the enclosure (which houses the magnet) and the base (which houses the circuit).
The enclosure is built out of a 1" wide section of 4" OD 1/8" wall aluminum square tubing. You can find this tubing at the local metal supplier but you may be forced to buy a 10, 12 or 20 foot length. Most communities have a retail metal shop that will sell in smaller quantities. These same shops will often also cut to the dimensions you need for free or a small fee. If you don't have a retail metal shop handy then check out the big box home improvement stores, or a local farm supplier. Drill a hole of an appropriate diameter (this depends on your coil) in the middle of the top of the tubing. Now mount the coil, running the wires down the back of the tubing. Then, drill a hole on each side 1" down from the top. Size the hole according to the LED holder you are using as this size can vary. Be sure to keep the holes as perfectly aligned as possible. If you are going to experiment with a different electromagnet or objects of various sizes, it will be helpful to make two slots instead of holes so that the LED and photo transistor can be moved up and down. Lighter objects can float farther from the coil which requires the optical components to be moved down to the same level. Mount the LED and photo transistor in their respective holders and secure them to the tubing using the nut or snap ring supplied with the holder.
Drill the front of your base to accept S1, R9 and D3 and mount the components. The exact project case you choose for your base will depend on your individual tastes and how you wish to decorate the bracket. Wherever you position these components, make sure they will not interfere with the top of the base or your ability to mount the circuit board.
Mount a jack to match your DC power adapter at the back of the base.
Enclosure and Base Assembly Diagram |
Final Assembly |
Mount the enclosure assembly to the top of your base using two small bolts and appropriate nuts. Whether you chose to center it or mount if off to one side will depend on how you intend to decorate it. Left raw, the enclosure is best positioned in the center as the exposed machinery will create a more precise look. If decoration is used, turning the levitator into a pencil holder for example, the enclosure is best mounted to one side so the pencil cup can be placed beside it.
Using a bit of creativity, covers for the exposed tubing and mechanical components can be made using many common materials. Cardboard, Plexiglas, Lexan, wood, glass and stone are some possibilities. Chose your material based on the types of objects you are most likely to float.
Testing And Operation |
The Electromagnetic Levitator is best operated in a location away from strong light sources that may interfere with the optical components. Enclosing them in some kind of decoration will go a long way to both improving the aesthetics and minimizing interference. Make sure that S1 is turned off, then plug in the power adapter and turn R9 fully counterclockwise. D3 should be of at this point. Slowly turn R9 and observe D3. At some point, D3 should turn on. If you keep turning R9, it will turn off again. Adjust R9 just to the point where the LED is off, which should be about half way.
You need an object to levitate so find a small and light steel object. Something like a key chain trinket, small hallow steel globe or beer bottle cap is ideal. The size of the object will depend on how close you are willing to keep it to the coil (by adjusting the position of D1 and Q1) and the coil you use. The specified relay coil is best suited for very light objects. Slowly lift your object towards the coil while making sure not to block the IR beam with your fingers. If R9 is adjusted properly the object will be lifted from your hand as you bring it near the coil, and suspended in mid air. If it oscillates up and down, back off on R9 slowly.
Non-metallic and heavier objects can be levitated by attaching a small magnet. Remember that the polarity of the magnet must be opposite of the coil as to be attracted and not repelled so if your object is shot away from the coil, reverse the magnet.
Related Circuits |
Comments |
| Add A Comment |
| nowadays dis kind of project should be suggested...can i get some project related to security purpose... | ||
| I really appreaciate this kind of project i want to try this, thanks. | ||
| sir i am not able to find potter and brumfield relay anywhere in India...and anyother relay is not responding well.Can you please suggest any substitute for the above as it is my project topic and i want to built it at any cost...plz do reply.
(Editor's notes: Read the notes.) |
||
| Bravo for this plan. Which is the role of transistors Q2, Q3, Q4 and Q6. Thank you for your answer. | ||
| Fair enough - there are plenty of anonymous schematics floating around. Good job with the website, that takes a lot more effort than nit-picking other people's work. (Editor's notes: No worries. I would have credited if I knew the source. Came from some photocopies in my files.) |
||
| To those people asking about the reguator, you can find the original design in the February 1996 issue of Electronics Now. If you google it you'll find it on a coilgn website. I have built the circuit and can confirm it works - search for 'zetaseeker' on youtube.
The regulator used in the original design is 9V. Not sure why the original design wouldn't be credited here when this is so obviously taken straight from it. (Editor's notes: I had no idea where the original design came from. Now it's credited.) |
||
| cool .. floating object. did you have video uploaded on youtube aaron channel tv ? :) | ||
| i have made it but it is not working properly as firstly the main prlblum is related to that potter & burmfield coil it is not easily available & i also tried after winding of this type of coil as according t the specification mentioned but it is not working properly. | ||
| is this gonna run? | ||
| In the circuit U1 output is 5V but in the parts list it is a 9V regulator. Which do I use? Please reply as I really want to build this. | ||
| The last 10 comments are currently shown. Show All Comments. | Add A Comment |