| anonymous |
Fantastic Atom Expander |
Thursday, January 29, 2015 11:49:45 PM |
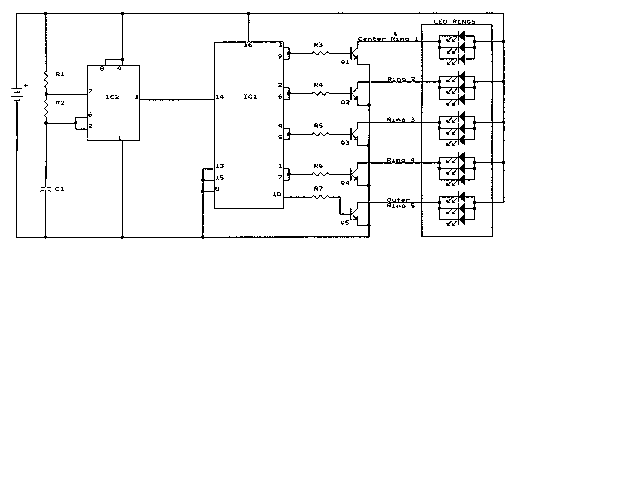
| This schematic is wrong, first they are connecting the pins 1-7 and other pins, they are already connected inside the 4017B chip, most retarded thing in the schematic, then transistors are flipped in the wrong direction,
Most stupid thing ever "" PIN 13,15 are going to the ground but they are also resetting the chip "" WTF is that
if you look in the 4017B datasheet you can see the gates and all the connections there ( functions of all the pins ). (Editor's notes: 1 and 7 (etc.) are not connected internally. They are connected in the schematic to reduce the number of outputs while still providing a smooth count.
The transistors are not backwards.
Pin 13, etc. are tied to ground to prevent them from floating.) |
| anonymous |
Fantastic Atom Expander |
Sunday, February 10, 2013 6:18:05 AM |
| Verry lousy schematic do it right or do nothing att all!!!!!! |
| anonymous |
Fantastic Atom Expander |
Sunday, May 27, 2012 5:41:48 AM |
| verry rare .bad drauwing circuit and layout not logic |
| anonymous |
Fantastic Atom Expander |
Sunday, August 02, 2009 5:20:54 PM |
| J means Jumper |
| anonymous |
Fantastic Atom Expander |
Thursday, April 16, 2009 10:34:22 AM |
| What yhe J letter means? It appears like J1, J2, J3, J4, J5 and J6! Thanks! |
| Jo�o Silva Brito |
Fantastic Atom Expander |
Thursday, April 16, 2009 9:59:32 AM |
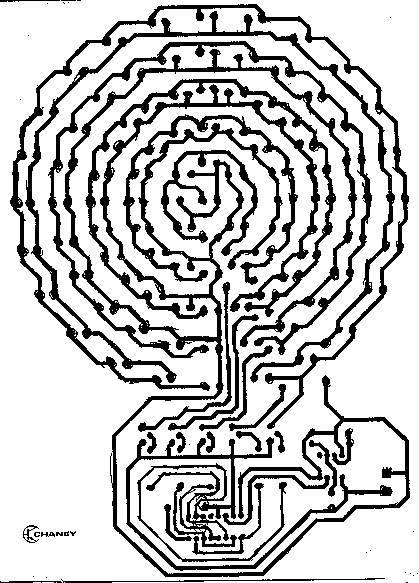
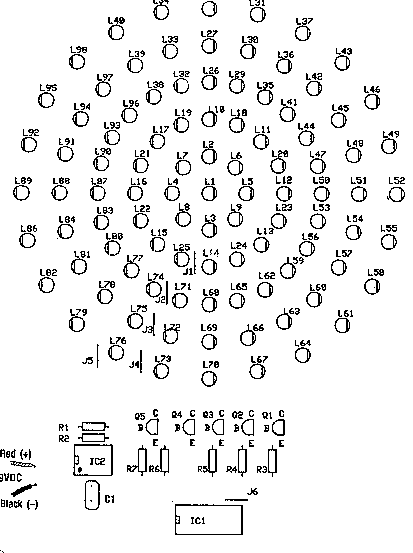
| It's just me or its missing from the parts placement de led place or number 85. From my count is 97 leds not 98!?!?
Please advise! |
| Jo�o Silva Brito |
Fantastic Atom Expander |
Thursday, April 16, 2009 7:02:54 AM |
| Hello! Could you please send me or improve the showned Schematic because i can't see all the numbers in the ICs. It's really important! Thank's!
|
| ChrisWhewell |
Fantastic Atom Expander |
Friday, January 23, 2009 10:38:13 AM |
| Is it a one-shot deal, or does it provide a continuous series of expanding light effect ?
Thanks |
| suraj |
Fantastic Atom Expander |
Tuesday, October 14, 2008 12:41:35 AM |
| circuit diagram is not clear |
| anonymous |
Fantastic Atom Expander |
Wednesday, April 23, 2008 12:59:36 AM |
| I built my atom expander following the design on this page. But it didn't work at first because the capacitor was to small. Eventully after trying many capacitors a 220pf(0.22uf) worked and gave me a working project. So i don't know what happend, everything else is right it was just the capacitor. oh well, anybody building the project, if it doesn't work and the ic's are working make the capacitor a bit bigger like a 220pf. |