| Home > RX-7 > Tech/Mods > Mods > Megasquirt > Programming The ECU (MS1) |
| Home > RX-7 > Tech/Mods > Mods > Megasquirt > Programming The ECU (MS1) |
This section covers programming the MS1 ECU to run the 13B rotary. Because there is such a difference between the setup of the various MegaSquirt versions, each ECU has it's own configuration page. Make sure you are reading the correct page for your ECU version.
If you have not already done so using a Stimulator during the build/modding section the first step is to flash the appropriate firmware into the Megasquirt. For convenience I've reproduced those instructions here.
The stock Bowling & Grippo firmware loaded onto Megasquirt CPUs from the factory will run the rotary, but it will run fuel only and without a lot of the features we depend on (such as staged injection). It is therefore necessary to load the Megasquirt and Spark Extra (MSnSE) firmware.
Disconnect the ignition coils from the harness before proceeding! Failure to do this will burn out the coils!
Plug the computer into the Megasquirt. For MS1, see the MSnS-Extra Software Manual for instructions on low to load the latest version of MSI/Extra.
Don't bother following the instructions on the above websites to configure the Megasquirt to your engine. We'll do that later.
At this point, if you have not already downloaded TunerStudio MS, do so now and install it. The free version will suffice for now however you may want to upgrade to the paid version when you start tuning as only the paid version can autotune the VE table.
Power up your Megasquirt and make sure that it is responding to inputs. The first time you run TunerStudio you will need to create a project for your ECU. DIYAutoTune has some great generic TunerStudio setup instructions.
Note that when you are configuring TunerStudio, you need to select the appropriate Lambda Sensor and Idle Controller. Set LAMBDA_SENSOR to "AEM_LINEAR -- AEM Gauge AEM-30-42xx" and IDLE_CONTROLLER to "PWM_GAUGE -- PWM Idle Valve (e.g., Ford or Bosch)".
Basic parameters need to be set up in the ECU to tell it the displacement of the engine, how many injectors it has, the trigger and ignition setup and what to do with it's outputs. These settings vary greatly between MSI and MSII so this section is divided up to cover each ECU separately. Each settings page will be shown with a chart of the settings, and a screenshot of what they look like. Any settings that are not mentioned can just be left default. Keep in mind that you don't have to be connected to the ECU to make these settings. But do not start with a blank map! Open up TunerStudio and connect to your ECU to download all the settings. Then save an MSQ. You can work on this MSQ offline if you find it more convenient than sitting in the car typing in settings. You can then load that MSQ into the ECU when you are in the car. If you are programming the ECU live, make sure to press "Burn To ECU" before closing each window. Otherwise the changes are made to the map in TunerStudio but not sent to the ECU.
I am not going to explain in detail every setting on this page. To do so would be a monumental task and simply repeat information in the Megasquirt manuals. With each screen I will give you the basic idea of what the settings do but if you want to know more, it is up to you to look it up.
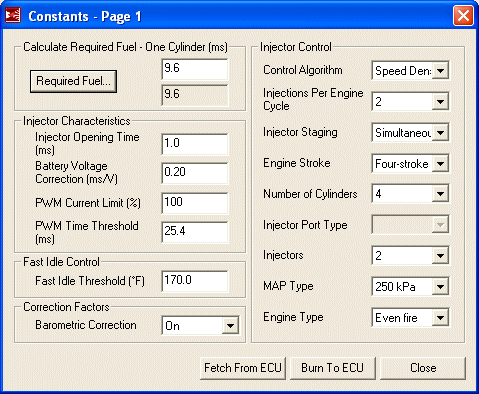
The settings are presented below in a list with the title of each item representing the menu choices needed to open up those settings. We start with the most basic characteristics of the engine.
These settings are the basic characteristics of the engine. Note that the number of injectors is set to two. This is correct, because even though we have 4, the secondaries are staged and not always operating.
|
|
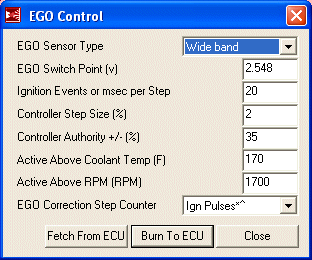
These settings control how the oxygen sensor is used to adjust the mixture under closed loop.
|
|
The "Controller Authority" tells the ECU how much it can change the mixture to achieve the A/F ratio set in "EGO Switch Point". For your initial tuning, this number should be set to zero (0) to disable closed loop. Once tuning of the light load area of the map is complete, it can be set back to 30% to enable closed loop correction.
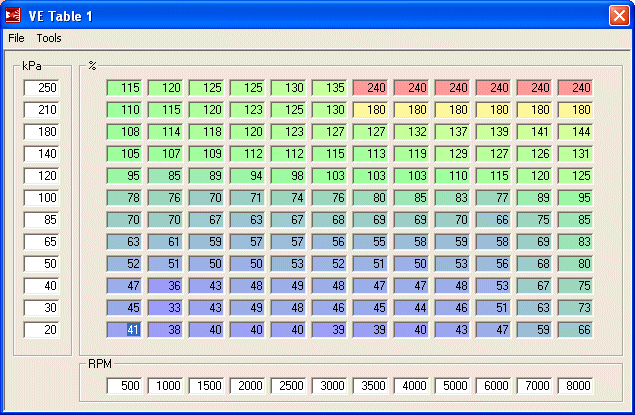
The VE (volumetric efficiency) table represents the main fuel map for the engine and is where you will be doing most of your tuning. Each engine combination is going to need a wildly different VE table and even two engines configured exactly the same will end up with a different table when tuned. Therefore, this table is only suited as a first startup and limp to the dyno map. It should start the car and run it reasonably well but is by far not ideal for your engine. It will give you a good place to start tuning. Do not just load this table, start the car and run the engine into boost. While this table should be safely rich everywhere, there is no guarantee. Carefully approach boost and judge for your self how much you have to richen up that area of the map before getting throttle happy.
|
Thankfully, TunerStudio doesn't require you to type that mess into the table manually. Tables can be imported and exported. Below is a link to this table TunerStudio's table exchange .VEX format. To import it, download the file and then from the VE Table 1 dialog, select "File" and then "Table Import...". Browse to the downloaded file and open it up to start the import. This is a table for a 13B turbo engine but will work equally well for an NA. If tuning an NA, all the bins above 100 kPa can be discarded and that side of the table rescaled with more resolution available from 0-110 or so. Set your last bin to 110 kPa because atmospheric pressure varies. |
|
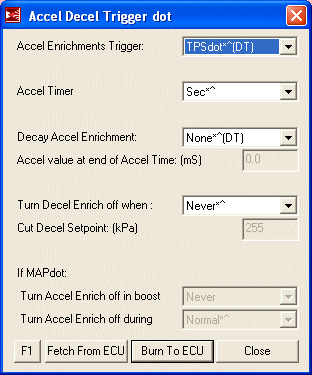
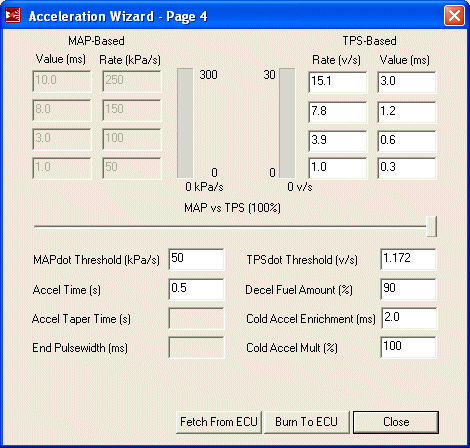
These settings control the basics of how the accelerator pump feature will work and how decel fuel cut will happen. Here we have set the accelerator pump to use the TPS (TPSdot) but changes in manifold pressure (MAPdot) can also be used. TPSdot is generally best in most circumstances as it response more directly to throttle changes. Only the settings mentioned below will be set. All others will disable themselves in the dialog box.
All other values are disabled. |
|
The Acceleration Wizard provides a convenient way to tune the accelerator pump. The settings here will provide you with a good baseline but you will need to spend some time here after the main VE table is set up to make throttle transitions smooth.
All other values are disabled. |
|
Disable RPM based acceleration enrichment by setting "RPM Based Accel Enrichment" to "Normal AE" on this page. It will likely already be disabled. This setting should then disable all further options under RPM Based Accel. While RPM based acceleration enrichment is a useful thing to have, it is something you will have to experiment with later as for now it will just confuse basic tuning.
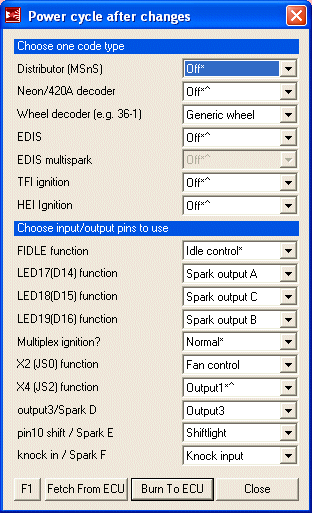
The codebase and outputs settings are where you tell the Megasquirt from where it should take it's ignition input and what to do with its I/O. We need to tell it that it should be reading it's RPM signal from the CAS (a "generic wheel", which we will configure later) and to use the status LEDs as ignition triggers. Also output X2 gets repurposed as a fan control.
|
|
Of course we are not using any of the options lower then JS0 so it really doesn't matter how many of them are set up. However if you select one of them as a spark output, you will cause the 'Squirt to throw an error because it will be confused when set to rotary mode. So leave them as you see here.
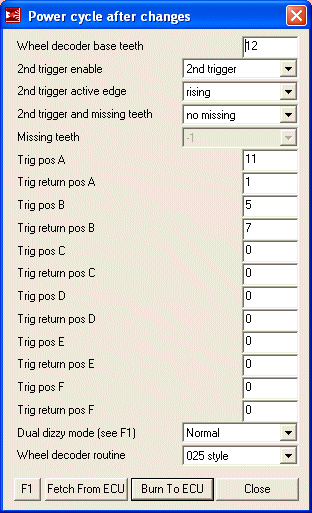
The previous settings page told the Megasquirt that it would be reading engine position via a trigger wheel, so now we need to tell the Megasquirt how it should interpret that wheel. Or in the case of the rotary CAS, that it will also be reading two wheels (why a 2nd VR circuit was added to the board).
|
|
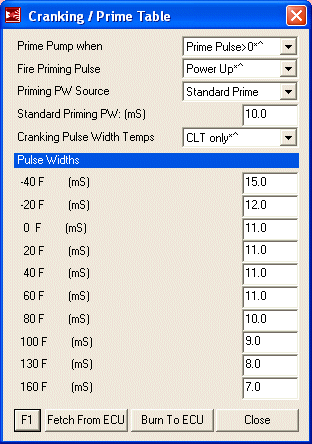
Cranking settings tell the Megasquirt what to do with fuel when the engine is being cranked. This screen includes a basic map which tells the Megasquirt how to prime the fuel pump and how long to open the injectors during cranking based on engine temperature. This map works very well and it's not likely you will need to change it much, if at all.
|
|
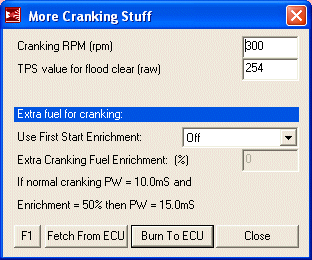
The creatively named "more cranking stuff" dialog simply has three options: the cranking RPM of the engine, how far the pedal needs to be pressed to enable flood clear, and fuel values for first start (of the day) enrichment. We're not using firs start do we'll just disable that and ignore it.
|
|
The raw TPS value for flood clear is the raw TPS reading from the A/D converter. The exact number will depend on what number is displayed for wide open throttle when the TPS is calibrated. The TPS calibration instructions will cover this.
After Start Enrichment (ASE) momentarily increases the fuel supplied to the engine just after starting for a specified number of engine cycles. An engine that has just been started is either usually dead cold or heat soaked, both conditions requiring a slightly richer mixture. Thus, ASE provides that extra fuel for a short period of time. For the first startup however, ASE can artificially enrich the fuel mixture and make the engine run unevenly. It will likely dip below the cranking RPM and thus reset the ASE, repeating the cycle. This is endlessly annoying when trying to first start an engine on an untuned standalone so for now we will disable ASE. You may enable it again if necessary when the engine is fully tuned. To disable it, set "ASE Timer" to "Cycles" and then "ASE TOTAL Time" to "1". This effectively disables it by only running ASE for one engine cycle. It doesn't matter what the other values on this page are for now. If/when you do turn on ASE, set "ASE Mode" to "Decay" and "MAP mode during ASE" to "Normal MAP". Then set your total time to a few hundred cycles and add your enrichment percents on the bottom half. Only small percentages (less then 35%) are normally needed.
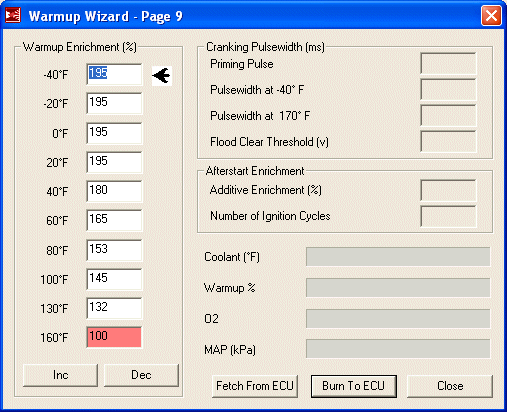
The Warmup Wizard is used to adjust the amount of fuel addition during the warmup phase of the engine. More fuel is needed to run a cold engine which needs to be tapered down as the engine temperature increases. Of course, since this is a percentage of the main fuel map it can really only be set after the engine is tuned and running well when warm. Additionally, you really only have one chance in a 24 hour period to tune the cold start as the engine must be stone cold to adjust these values. The table presented below is a good place to start but what you end up with will undoubtedly be totally different. You need to experiment to find an A/F ratio that your engine likes at various temperatures.
|
|
While the engine is warming up, you can use the "Inc" and "Dec" buttons to adjust the amount of warmup correction applied at that temperature. TunerStudio will interpolate between values if the temperature is between bins.
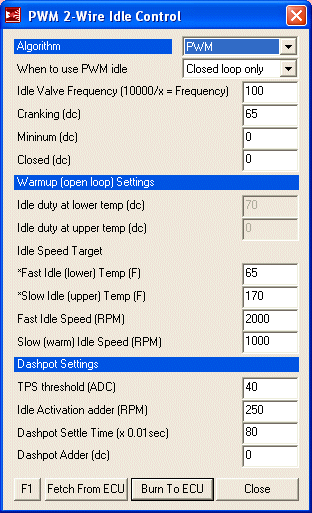
These settings specify how the BAC valve is to be used to control the idle of the engine. There are two ways the Megasquirt can use the BAC; warmup only and closed loop idle control. Warmup only simply idles the engine up when it is cold, starting at a fixed duty cycle and then going down in a linear fashion until the valve is closed when the engine reaches operating temperature. Closed loop idle goes a step further and uses the BAC valve to control engine idle at a specific set point regardless of operating temperature. It still allows a higher cold idle but continues to use the BAC anytime the throttle is closed to keep the engine at a steady RPM. In this way, it can compensate for electrical loads such as headlights or an electric fan. The settings presented here are for a closed loop idle, however I recommend you use a warmup only setting until the engine is tuned. Closed loop idle relies on the VE table having the correct values as well as proper warmup enrichment settings. If those settings are out of whack, getting a proper idle on the BAC valve is going to be difficult if not impossible. The engine will hunt and stumble as the Megasquirt constantly tries to compensate for a wildly wrong fuel table.
Some of the settings here can only be accessed when the system is set to "Warmup only" and some are only accessible when set to "Closed loop only". Thus, first set the system to "Warmup only" and plug in all the values you can. Then set it to "Closed loop only" and put in the rest.
|
|
Leave this dialog at "Closed loop only" because there is another screen of settings regarding closed loop idle. Down at the bottom, the "Dashpot Settings" are for a software dashpot. For now, the easiest thing to do is disable this by setting the "Dashpot Adder" to "0". See "TPS threshold"? That is the raw closed value of your TPS which tells the Megasquirt when the throttle is closed enough to bother with the dashpot. We'll come back to this in TPS calibration.
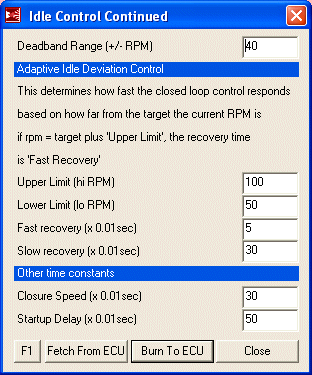
The closed loop settings tell the Megasquirt how aggressive it should be in correcting the idle speed of the engine. This screen is where you will spend most of your time tuning the closed loop idle. Primarily you will adjust the recovery times and closure speeds. The upper and lower RPM limits tell the Megasquirt when to recover the idle quickly (if the difference is at the upper limit or above) and when to recover it slowly (if it is near the lower limit). If the variance is within the dead band range, it is ignored and the Megasquirt does not correct it. The lower limit should be near the dead band range and the upper limit around twice the lower limit. The fast and slow recovery times tell the Megasquirt how fast it should seek to control the idle when it is outside the specified limits. Closure speed controls how quickly the Megasquirt should close the valve, and startup delay controls how long it should wait after the engine is started before it starts correcting the idle.
|
|
Now that this is setup, you can go back to the previous screen and change it to "Warmup only" to avoid hassles with the first startup.
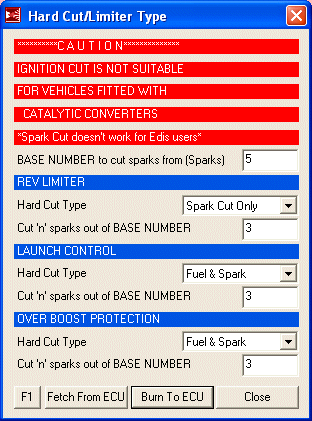
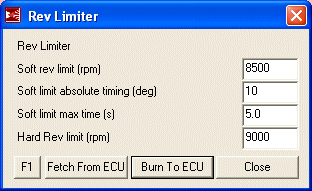
The Megasquirt has a number of rev limits and ways of accomplishing them. We really only care about the main rev limiter at the moment. Cutting spark is the safest way to do this in a turbocharged application. For now, "Launch Control" and "Over Boost Protection" can be ignored.
|
|
Here we set the actual rev limits. In these example settings, the soft rev limit comes on at 8500 RPM and retards timing by 10 degrees. This is to reduce engine power and inform the driver that the hard limit is about to take place. If the soft limit is active for 5 seconds the hard spark cut occurs. If the engine hits 9000 RPM, then the hard spark cut happens regardless.
|
|
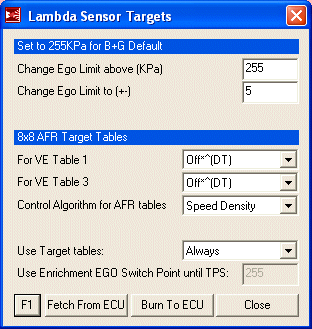
The Megasquirt can run using an AFR target table and the O2 sensor to correct the mixture throughout the entire fuel map. This is referred to as "observer based control". It is absolutely not useful until the VE table is tuned near perfectly and it is not necessary to run the car. So here we just disable it by setting both target tables to "Off". You may experiment later at your leisure.
|
|
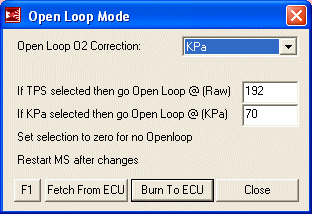
The open loop settings tell the Megasquirt when it should not be using the oxygen sensor to correct the mixture. The basics of when it should go into closed loop were already set up in the "Exhaust Gas Settings" dialog. These tell the 'Squirt when it should get out of closed loop and use the VE table. The easiest way is via manifold pressure and that is how it is set up here. If your setup doesn't draw a lot of vacuum at highway speeds, you may need to switch to "TPS" and experiment with the TPS value. In either TPS or KPa mode, the tuning method is the same: simply observe a point where the value stays below during light load driving and then use that value. The default value of 70 KPa here should suit most conditions.
|
|
The over run settings describe when fuel should be cut during deceleration. The amount of fuel to cut is already set in the "Accel Deccl Mode" dialog but these parameters specify exactly when that fuel is cut. Most of them are pretty self-explanatory and these are a good starting point for a stock port engine. The TPS value will need to be adjusted for your car but we will cover this in the TPS calibration. The rest should be fine for most applications.
|
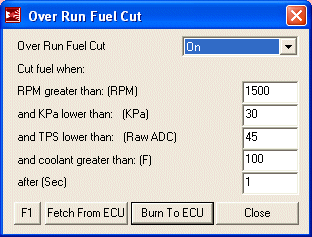
|
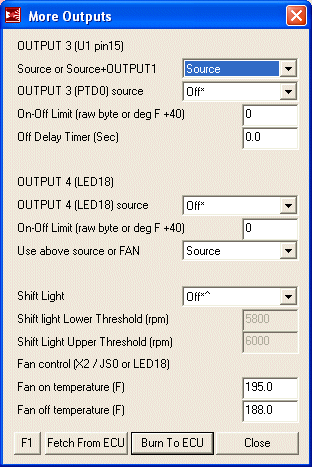
Unless you have a reason otherwise, set "Tacho output pin" to "OFF". This should be the default.
Leave it at the default settings.
Make sure that "Output 1" and "Output 2" are set to the default of "Off"
The only thing we care about here are the fan settings, so just make sure that "OUTPUT 3" and "OUTPUT 4" are set to "Off". The temperatures given here work well with the FCs stock thermostat and allow the fan to run when necessary but keep it off when there is enough airflow through the rad. If you make the on and off temperature too close, the fan will cycle needlessly. If the on temperature is too high then the car will tend to heat up a lot and take too much time to cool down. If you run the fan at too low a temperature, it will just stay on all the time which defeats the purpose of an electric fan.
|
|
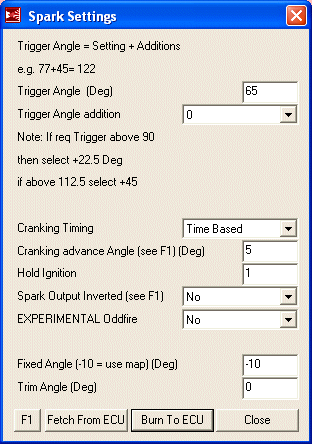
Spark settings tell the Megasquirt where the sensor is in relation to the trigger wheel, what to do with timing during cranking and how to drive the spark output (coils). There is also the important "Fixed Angle" setting which locks the timing. We will use this later when the engine is running to position the CAS properly. These settings are "set it and forget it" so after the initial setup you will not be going back here.
|
|
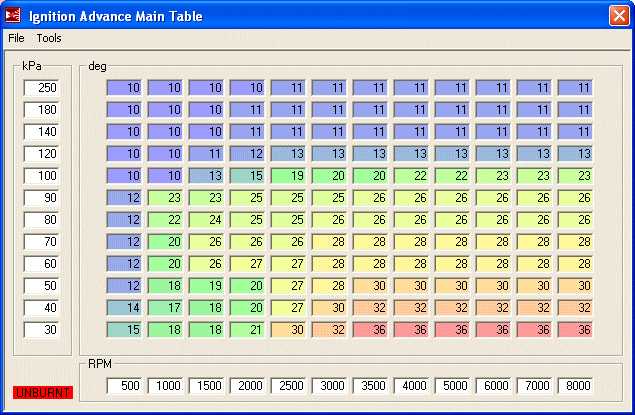
This is the main timing table referenced anytime the engine is running. The only period during which this table is not used is when the engine is cranking. This table should run most rotary engines quite well and you will probably only have to make minor adjustments. It is safe to run in boost as well as in NA applications.
|
Thankfully, TunerStudio doesn't require you to type that mess into the table manually. Tables can be imported and exported. Below is a link to this table TunerStudio's table exchange .VEX format. To import it, download the file and then from the Spark Table 1 dialog, select "File" and then "Table Import...". Browse to the downloaded file and open it up to start the import. This is a table for a 13B turbo engine but will work equally well for an NA. If tuning an NA, all the bins above 100 kPa can be discarded and that side of the table rescaled with more resolution available from 0-110 or so. Set your last bin to 110 kPa because atmospheric pressure varies. |
|
Set "Use Spark Table 1 until..." to "Spark Table1". This is the default. All other options are now disabled.
Set "Idle advance (-10 = use map)(Deg)" to "-10". This should be the default and tells the Megasquirt to use the main spark map to determine timing at idle. All other options on that window are ignored and can be left alone.
Set "Knock Detector System" to "Off". This is the default. All other options are now disabled.
Set "Coolant/Iat Related Advance" to "Off". This is the default. All other options are now disabled.
Note: If you have high IATs and/or a stock top mount intercooler, you will probably want this turned on later. IAT ignition retard will allow you to pull timing if you are experiencing high intake temps that may be caused by an inefficient (like the stock) turbo and/or a stock top mount intercooler. If you are running more then 15 degrees of timing under boost and experiencing high intake temps you will want to start pulling out timing to avoid detonation.
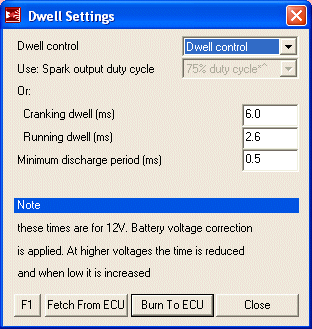
Dwell is how long the Megasquirt charges the ignition coils between sparks. It is unlikely you will need to adjust these settings unless you are using aftermarket ignition boxes. In the case of aftermarket boxes, they generally take care of dwell themselves so you will use a fixed duty cycle.
|
|
"Wheel simulator" should always be set to "off" unless the Megasquirt is on the stimulator! Never should this be used in the car! As you may be able to guess, the default is "off".
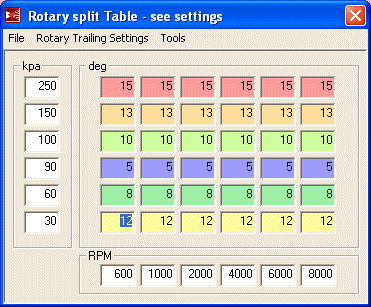
The trailing settings specify how many degrees after the leadings the trailing plugs fire. This is referred to as "split". The table presented here is safe and efficient for both turbo and NA cars. As tuning split is a bit of a black art and rather hotly debated, leave this table alone unless you have an idea of what you are doing. The one thing you may want to do is dial in a few more degrees of split under boost for a bit more safety. Though 10 degrees is safe, many tuners run around 15 degrees.
|
Thankfully, TunerStudio doesn't require you to type that mess into the table manually. Tables can be imported and exported. Below is a link to this table TunerStudio's table exchange .VEX format. To import it, download the file and then from the Rotary trailing settings dialog, select "File" and then "Table Import...". Browse to the downloaded file and open it up to start the import. This is a table for a 13B turbo engine but will work equally well for an NA. If tuning an NA, all the bins above 100 kPa can be discarded and that side of the table rescaled with more resolution available from 0-110 or so. Set your last bin to 110 kPa because atmospheric pressure varies. |
|
You will find this dialog by clicking the "Rotary Trailing Settings" menu in the "Rotary Trailing Settings" dialog box, and then selecting "Rotary trailing settings" from the menu. Confusing enough? I in order to make use of that split table we just entered, we need to actually turn trailing split support on then tell the Megasquirt to pull split values from the map.
|

|
You will find this dialog by clicking the "Rotary Trailing Settings" menu in the "Rotary Trailing Settings" dialog box, and then selecting "Rotary trailing output type" from the menu. There is only one option here called "trailing output type" which needs to be set to "FC Trailing
Just check over these settings to make sure they are at the defaults. These settings just tell the Megasquirt which fuel table to use for the INJ2 which we don't care about because we are using staged injection. I'm not going to bother with a screenshot here because you'll likely never visit this dialog again. All the settings here are defaults.
| Setting | Value |
|---|---|
| GammaE: | on |
| Injector channel 2: use table: | 1 |
| Injector channel 2: GammaE: | on |
| Pulse inj2 during cranking | On |
| NOS on or when Pin6 JP1 low. | Dont switch |
Turn launch control off by setting "Launch Control" to "Off", which is also the default.
Turn nitrous control off by setting "Nitrous Control" to "Off". This is the default.
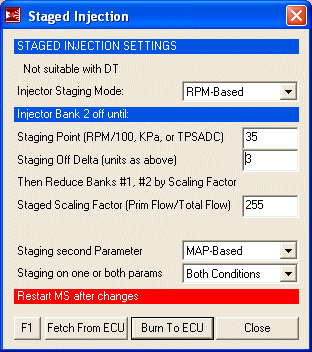
This first dialog configures the basic parameters which determine when the secondary injectors are brought online. These settings tell the Megasquirt that we are going to "arm" the injectors at a certain RPM, what point that RPM is, the difference in size between those injectors and then that they should only fire if a second condition is met as well. In this case, when manifold pressure is the second condition.
|
|
IMPORTANT! Injector Sizes and Scaling Factor: The scaling factor you enter here will be dependant on the size difference between the primary and secondary injectors. "255" is the number to be used when both injectors are the same size as is OEM in all stock 2nd gens. If you have a larger secondary injector, you must calculate a new scaling factor. To do this, use the following equation:
Scale factor = Primary Injector Size/(Primary Injector Size + Secondary Size)* 512
So if we have 550CC primaries and 1680CC secondaries, it would look like this:
Scale Factor = 550/(550 + 1680)* 512
Scale Factor = (550/2230) * 512
Scale Factor = 0.246 * 512
Scale Factor = 126 (actually 125.9 but I rounded)
You must perform this calculation otherwise the car will be very hard to tune as the secondaries come online and the map will end up with a massive difference in values around the stage point.
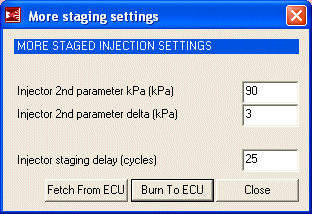
The aptly named "More Staged Injection" dialog contains the settings for the second staging parameter. Also available is the staging delay setting, which determines over how many ignition cycles the injectors are to be brought online.
|
|
Over boost protection allows you to cut all fuel if boost increases passed a certain pressure. This could happen, for example, if a wastegate hose blows off. For initial tuning this setting should be disabled so just set "Over Boost Hard Cut if Boost hits (KPa)" to "250".
The Megasquirt has a basic traction control system that can reduce engine power if it senses a traction loss through either RPM or vehicle speed spikes. You may want to play with this later, but for now, disable it by setting "Traction Control" to "Off".
Here you can make minor adjustments to the Megasquirt's air density calculation (thus effecting fuel and ignition) based on coolant temperature. These changes should only be made to a fully tuned engine and the Megasquirt already makes these corrections automatically. So leave everything here alone unless the engine is fully tuned and you have a reason to touch these settings.
Some of these advanced settings alter the most basic functionality of the ECU and all of them should be at defaults for the rotary. No sense making a screenshot of these since you will only check them once and them never be here again.
| Setting | Value |
|---|---|
| Hybrid Alpha N | Off |
| Mass Air Flow Meter MAF: (X7) | No AFM |
| Air Density Correction | Use IAT (disabled) |
| EDIS multispark | Off (disabled) |
| EDIS multispark rpm limit (rpm) | 1100 (disabled) |
| False trigger protection | Enabled |
| Hardware Latency (us) | 0 |
You're probably now asking yourself why I didn't just provide a base map that you can load into the ECU with all of those settings already in place. Well, what would you have learned then? If I had just provided a base map without explaining the key settings then you would have no basis of knowledge for possible troubleshooting.
Now that you've spend the better part of an hour entering those settings, it is time to power prepare the Megasquirt for first startup by setting the TPS.
Before we can start the car, the Megasquirt needs to know what value on the TPS represents closed throttle and what value represents wide open throttle.
With the laptop connected, power on the car but do not attempt to start it. If you entered the map correctly the fuel pump should prime for a few seconds and then shut off. All the gauges in TunerStudio should come to life. The water temp and intake temp gauge should show ambient temperatures if the car is at room temperature.
From the from the "Tools" menu, select "Calibrate TPS..." to show the following screen:
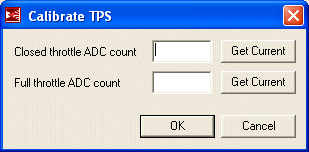
With the throttle fully closed, press the top "Get Current" button. A number will now show up beside "Closed throttle ADC count". Remember this number, you will need it later.
Now floor the throttle and press the bottom "Get Current" button. A number will now show up beside "Full throttle ADC count". If this number is smaller then "Closed throttle ADC count", your TPS is connected backwards. Remember this number, you will need it later.
Click the OK button. Thus ends the TPS calibration.
Now that you know the value representing a open or closed throttle, a few of the settings screens need to be revisited. Reopen the "Crank/WarmUp: More Cranking Stuff" window and then modify the "TPS value for flood clear" setting. Subtract about 5 from your throttle open ADC count and enter that number. This will tell the Megasquirt to activate flood clear when the throttle is nearly full open during cranking. Burn those settings then head over to "More settings: Idle Control" and look at the "TPS threshold (ADC)" setting under "Dashpot Settings". Add about 10 to your closed throttle ADC count and enter that number. Burn those settings. In the "More settings: Over Run Settings", change the value of "and TPS lower than: (raw ADC)" to the closed throttle ADC count plus about 15 (ie. if the closed count is 40, use 55).
It's all been building to this and now the time has come. The next section of this writeup covers how to start the car, set the base timing and get something resembling an idle.
Back To Mods Page | Mail Me | Search | ![]()